Windows 10 Uninstall OneDrive – Learn how to disable or uninstall OneDrive from Windows 10 PC? Top 3 methods to completely disable or remove OneDrive from Windows 10 computers
Online Cloud storage is the new way to keep data on the go. There are many cloud storage services available in the market and one of the best services is OneDrive by Microsoft. With Windows 10 you get OneDrive preinstalled in the OS allowing one to easily save all the data without installing any application. While there are people who are happy with preinstalled OneDrive app in Windows 10, some don’t use it at all.
Important note: Do you want to get 100GB free OneDrive storage? If yes, follow this guide to Get 100GB Free OneDrive Storage

If you are using any other cloud storage service or don’t want to use OneDrive you can easily uninstall OneDrive from Windows 10. There are different methods which you can follow if you want to uninstall or hide OneDrive in Windows 10 and today we are going to share top 3 most active methods with you.
You may also be interested in checking out:
- Top 10 New Features of Microsoft Office 2016
- How to Set Up and Use iCloud on Windows PC
- Combine Multiple Cloud Services Together Using MultCloud
- How to Improve Windows 10 Laptop Battery Life
- How to Fix Windows Updates Stuck at 0% in Windows 7/8/10
- How to Autostart Programs in Windows 10 without Using Any Software
Top 3 Methods to Disable or Uninstall OneDrive from Windows 10
Unlike all earlier Windows operating systems, OneDrive comes installed with Windows 10 operating system too. But if you don’t use OneDrive on your Windows 10 PC and also don’t want it running in the background, there are various methods which can be used to completely disable or uninstall OneDrive in Windows 10 and get rid of it everywhere in your PC.
So, let’s have a look at the step by step methods to completely remove OneDrive from Windows 10 computers:
Method 1: Hide or Disable OneDrive from Windows 10 using Local Group Policy Editor
The process of disabling OneDrive from Windows 10 or Windows 10 remove OneDrive is quite simple and you haven’t to do any complex changes. Here’s how to disable OneDrive from Windows 10 using Local Group Policy Editor:
Step (1): First of all, you have to open the Run dialog box. Press Windows + R keys together and the Run dialog box will pop up on your screen.
Step (2): Now you have to type GPedit.msc. Hit the Enter key and then select Ok. From here you have to select Local Group Policy Editor.
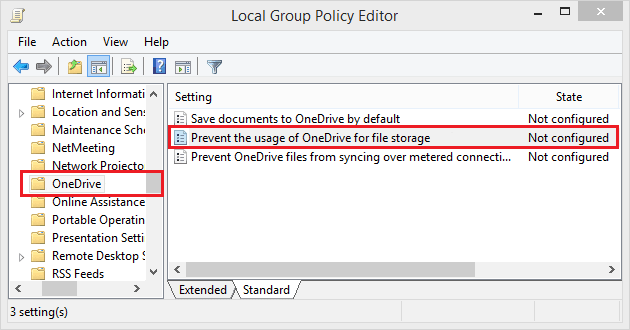
Step (3): Once you have opened the Local Group Policy Editor, go to Local Computer Policy → Computer configuration → Administrative Templates → Windows Components → One Drive.
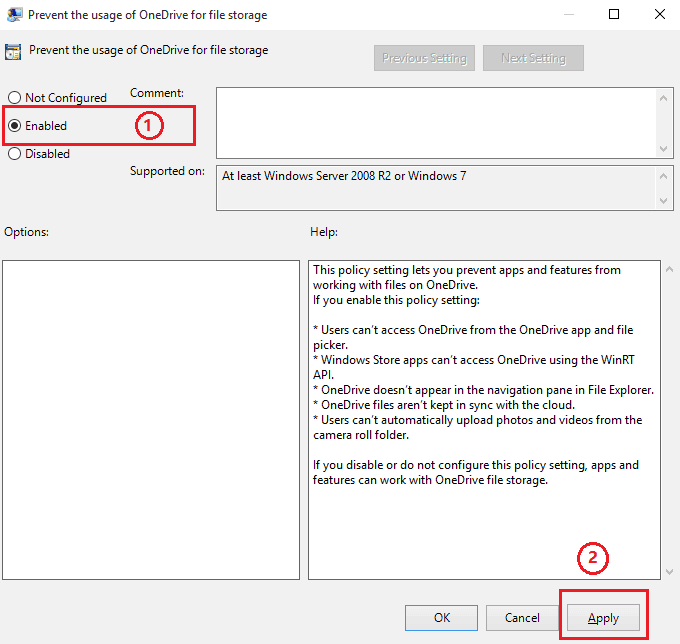
Step (4): Now go to the right pane. From here you have to double click on one policy. The policy which you have to select is Prevent the usage of OneDrive for file storage.
Step (5): Choose the Enabled option from here. Once you have selected, click on the Apply button and then OK. It’s done.
This will disable the OneDrive icon from the File Explorer. Along with it, you have also disabled OneDrive in Windows 10.
Read also:
Method 2: Hide or Remove OneDrive from Windows 10 Navigation Pane
You might have noticed that OneDrive is also present in the navigation pane of your Windows 10. You can easily remove OneDrive from Windows 10 navigation pane by following the guide shared below:
Step (1): Firstly, you have to open the Run dialog box. Press Windows + R keys together and the Run dialog box will pop up on your screen.
Step (2): Now you have to type RedEdit.exe in the Run window and Hit the Enter key. Registry editor will be opened on your computer which will help you to uninstall OneDrive in Windows 10 navigation panel.
Step (3): Now you need to go to a registry key with address:
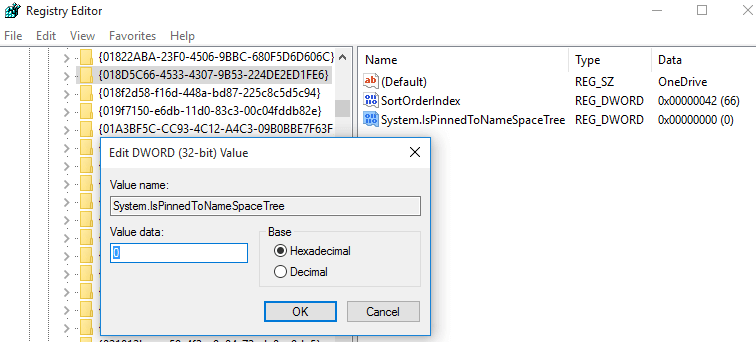
HKEY_CLASSES_ROOT\CLSID\{018D5C66-4533-4307-9B53-224DE2ED1FE6}
Step (4): Once you have opened this registry key you need to change one data value. Select System.IsPinnedToNameSpaceTree and change its subkey value to 0.
Step (5): Once you have made the changes, restart File Explorer window. You will see that OneDrive is not present in the navigation pane.
This is another simple way to disable OneDrive from Windows 10 computers.
Check also:
- Top 10 Methods to Customize Windows 10 Taskbar
- Top 3 Methods to Make Windows 10 Start Menu Open Faster
Method 3: Uninstall OneDrive from Windows 10 using Command Prompt
This is the third and the last method which you can follow to uninstall OneDrive from Windows 10. You won’t be able to manually remove OneDrive in windows 10. To disable OneDrive from windows 10 you have to use a set of commands.
Step (1): At first, open command prompt with administrative privileges on your Windows 10 PC.
Step (3): Once the Windows Command Prompt appeared on your computer screen, now enter the command given below which will disable all the OneDrive tasks running on your computer.
taskkill /f /im OneDrive.exe
Step (4): And after that, enter the following command according to the version of Windows you are using.
If you are using Windows 10 32-bit edition, enter this command:
%SystemRoot%\System32\OneDriveSetup.exe /uninstall
If you are using Windows 10 64-bit edition, enter this command:
%SystemRoot%\SysWOW64\OneDriveSetup.exe /uninstall
Once you have initiated all the above-mentioned commands, Windows 10 uninstall OneDrive process will be completed. You won’t get any notification about Windows 10 remove OneDrive however if you will search for Onedrive you won’t find any app.
Conclusion
So, these are the top 3 most useful methods which you can use to uninstall OneDrive from Windows 10. If you are facing any problems or are not able to remove OneDrive from Windows 10 PC, you can clear your doubts using the comments section below.
Also, let us know – Which method of completely disabling or uninstalling OneDrive in Windows 10 you liked the most?
Read next: How to Disable Automatic Updates in Office 2016


