Do you want to change User Account Control settings in Windows operating system?
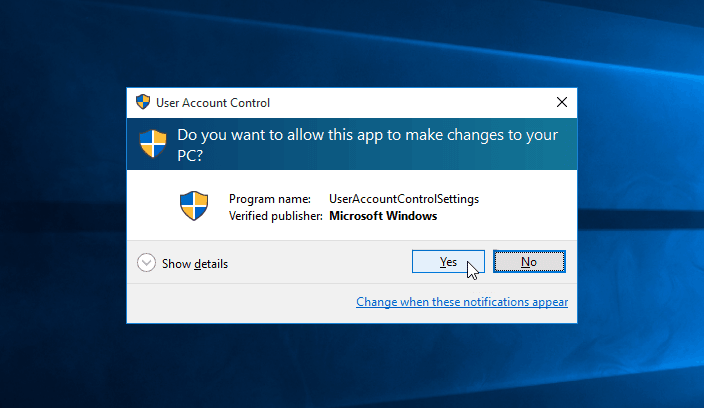
There is a common feature in Windows 7, 8 and 10 operating systems which is called User Account Control (UAC). You might have seen that if you are going to install any application or make changes to it on your Windows computer, you see a user account control warning dialog box on your computer.
The dialog box comes with a warning “Do you want to allow the following program to make changes to this computer?” Clicking Yes or No will close the box.

If you are still now able to understand what user account control (UAC) means, you can check the next part of this post where all the important information related to user account control settings has explained. So, let’s see now – what is user account control and how to enable or disable user account control (UAC) in Windows 10, 8, or 7 operating systems?
You may also be interested in checking out:
What is User Account Control (UAC)?
User Account Control (UAC) is a useful feature which is present in almost all Windows operating systems. This feature allows you to manage the applications when you are trying to make any changes to them. If you are planning to do some changes in any application installed in your computer at administrative level, then you will see a warning. You have to give permission to the computer so that changes can be done.
You can also very easily adjust the permission level of your user account in order to use the user account control feature according to your wish.
How to Enable or Disable User Account Control in Windows 10 and 8
If by any reasons you didn’t want to have this feature on your Windows PC, you can enable user account control or disable user account control using these steps. Follow the methods shared below to enable or disable user account control in Windows 10 or Windows 8 computer:
Method 1: Enable or Disable User Account control in Windows 10 from Control Panel
Step (1): First of all, click on the start button and then enter User Control. You will see “Change User Account Control Settings” in the search results. Click on it.
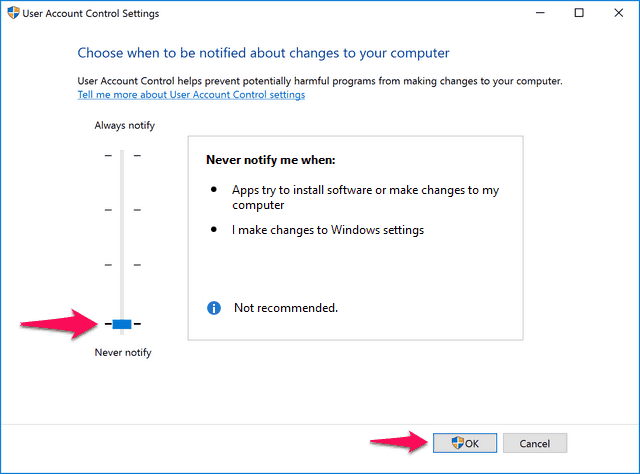
Step (2): You will see a screen on your computer screen which will show different options. From here you can change user account control settings. The options which you can select from here are:
- Always Notify Me when: Programs try to install software or make changes to my computer and when I make changes to Windows settings.
- Notify me only when programs try to make changes to my computer: Don’t notify me when I make changes to Windows settings.
- Notify me only when programs try to make changes to my computer (Without Dimming the desktop): Don’t notify me when I make changes to Windows settings.
- Never Notify me when: Programs try to install software or make changes to my computer and when I make changes to Windows settings.
These are the four different options which you will see in user account control settings.
If you want to enable user account control, you can select the first option (Always Notify Me when) whereas if you want to disable user account control you can select the last option (Never Notify me when).
Method 2: Enable or Disable User Account Control in Windows 8 from MSCONFIG
This is another helpful method which you can follow to enable or disable user account control in Windows 8 PC.
Step (1): At first, open Run dialog box on your computer by pressing combination of Windows + R keys together and type msconfig and then press Enter.
Step (2): From the window which will appear on your computer, select System Configuration.
Step (3): Now you have to choose Tools.
Step (4): In the Tools menu, you have to choose Change UAC Settings and select the launch option.
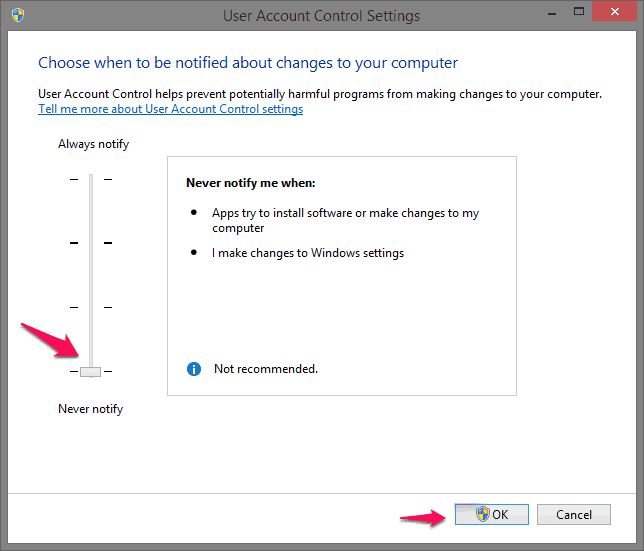
Step (5): Here you will see 4 options [Always Notify Me when, Notify me only when programs try to make changes to my computer, Notify me only when programs try to make changes to my computer (Don’t Dim Desktop), Never Notify Me when.]
To enable user account control you can select the Always Notify Me when option whereas if you want to disable user account control you can select the Never Notify Me when option.
You may also be interested in checking out: How to Fix Mouse Pointer Automatically Moves to Upper-Left Corner of Screen in Windows 8.1
How to Enable or Disable User Account Control in Windows 7
If you are using Windows 7 and want to enable or disable user account control in Windows 7 you can follow the steps which we have shared below.
Step (1): Click the Start button and using the Start search box, enter UAC to open user account control settings.
Step (2): In the search results, you will see Change User Account Control Settings. Select this option as it will help you to change user account control settings. If you see a dialog box, press Yes option.
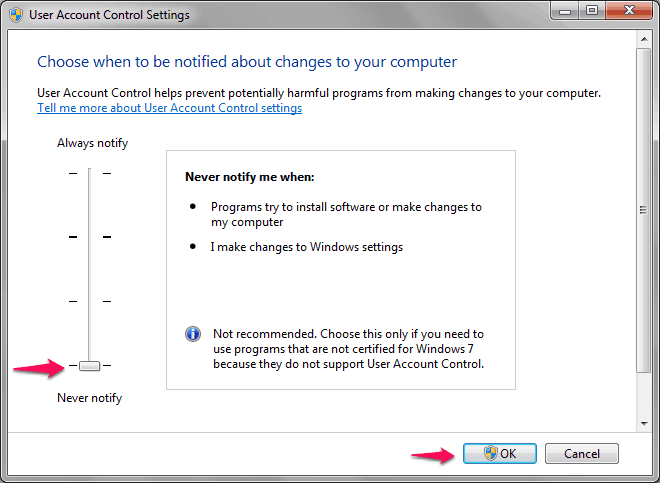
Step (3): Now you will see 4 options or settings which will say:
- Always Notify Me when.
- Notify me only when programs try to make changes to my computer.
- Notify me only when programs try to make changes to my computer. (Don’t Dim Desktop)
- Never Notify Me when.
Step (4): If you want to enable user control settings then select the first option (Always Notify Me when) whereas if you want to turn off user account control then choose the last option (Never Notify Me when).
Thus, you can see how simple is to change user account control settings in Windows 10, Windows 8, and Windows 7 operating system. You might also like to see: How to Enable or Disable Taskbar Thumbnail Preview in Windows 7
Conclusion
We hope you liked our guide how to turn User Account Control on or off in Windows. If you are not happy with user account control notifications you can enable it or completely turn off user account control using the above mentioned methods. We have tested these methods and they work perfectly on Windows 7, 8 and 10 computer.
Follow the above mentioned steps carefully in order to change user account control settings and easily get rid of frequent warning “Do you want to allow the following program to make changes to this computer?” while making a change that requires administrator-level permission in Windows computer.


