Are you wondering what version of .NET Framework comes with Windows 10 system or how to check .NET Framework version in Windows 10 computer? Let’s find out.
Have you ever felt the need to check .NET Framework version running on your Windows 10 computer or laptop? Or, Do you want to know what version of .NET comes with Windows 10 systems? If your answer is “Yes” then you are landed in the right article today.
Many programs on the Microsoft Windows operating systems use the .NET framework to function correctly. The .NET Framework, developed by Microsoft, is a collection of technologies that enables developers and helps them build functional apps for Windows, Mac, Linux, Android, and iOS.
Most Windows installations come with .NET on them and if you wish to check .NET framework version on your system but don’t know how to do that then worry not. In this guide, I’ll teach you how to check .NET framework version in Windows 10 operating systems and what are the best ways to check .NET version running on your Windows computer or laptop.
So, without further ado, let’s dive right in and learn how to check .NET Framework version installed in Windows 10 PC.
What .NET Framework Comes with Windows 10?
All editions of Windows 10 include the .NET Framework 4.6 as an OS component and it is installed by default on every standard Windows 10 installation. Windows 10 editions also include the .NET Framework 3.5 SP1 as an OS component that is not installed by default. The .NET Framework 3.5 SP1 can be added (if required) or removed by visiting the Programs and Features section in the Control Panel.
Older versions of Windows such as Windows XP, Windows 7 and Windows 8 or 8.1 ships with .NET Framework 1.0, .NET Framework 3.5 and .NET framework 4.5 respectively.
According to an official guide (.NET Framework versions and dependencies) published by the Microsoft:
Each new version of .NET Framework adds new features but retains features from previous versions. The CLR (common language runtime) is identified by its own version number. The .NET Framework version number is incremented at each release, but the CLR version is not always incremented.
And since now we got the basic knowledge of what version of .NET Framework comes with Windows 10 operating systems, it’s time to learn how to check .NET Framework version installed in Windows 10 PC.
How to Check .NET Framework Version in Windows 10
There are several versions of .NET Framework available for Windows operating systems, few of them (.NET Frameworks) are included in some Windows OS by default (as we have already discussed earlier) and all .NET Framework versions are available for free official downloads at Microsoft website as well.
If you wish to see all the available Microsoft .NET Framework versions, just go to the Download .NET Framework page and you will be able to see the recommended version, released date, and all the details you need.
Although, there are plenty of ways to determine which .net framework versions are installed on any Windows computer. But when it comes to Windows 10 operating systems, some of the best methods to check .NET Framework version in Windows 10 are through the Windows Explorer, Windows Registry Editor, and Command Prompt or Windows PowerShell.
And today here in this guide, we are going to explain each of them step by step. So let’s begin and discover how to check .NET Framework version in Windows 10 laptops or desktop computers. Here we go:
Method 1: Check .NET Framework Version Manually
Windows Explorer and Control Panel – These are the two very basic and manual ways of checking which version of Microsoft .net framework is installed in your Windows 10 computer. But here we are going to proceed with the method that includes Windows Explorer (because of its accuracy in the result).
So, just follow these steps and learn how to check .NET Framework version installed in Windows 10 using the Windows Explorer:
First of all, open the File Explorer and navigate to these folder locations one by one:
- C:\Windows\Microsoft.NET\Framework
- C:\Windows\Microsoft.NET\Framework64
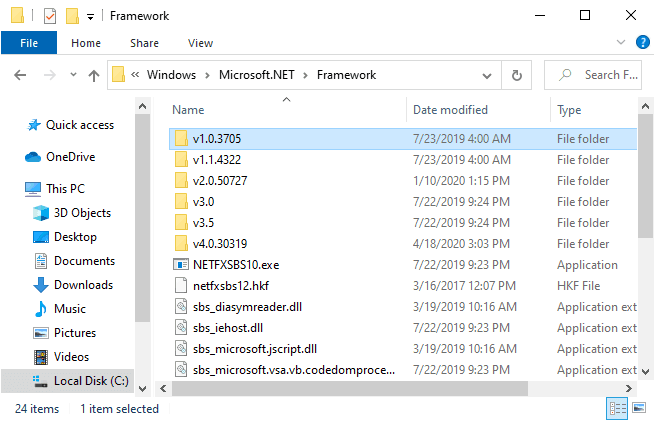
All the .NET Framework versions are installed into these two folders. Here each .NET version corresponds to a separate directory with the v characters at the beginning and the version number as the folder name. From here, you can easily find out which versions are installed on your system.
Alternative solution: In case, if you are feeling confused after seeing plenty of files and folders available under the Framework and Framework64 folder then you can follow these steps:
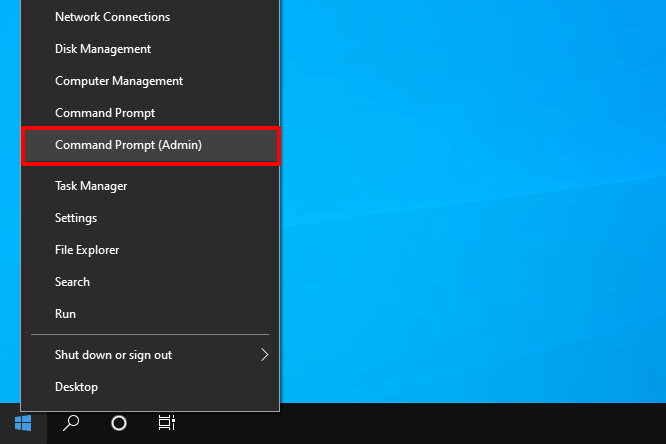
- At first, right-click on the Start menu and then select the Command Prompt (Admin) option.
- Once the Command Prompt with administrator privileges is opened, simply run the following command:
dir %WINDIR%\Microsoft.Net\Framework\v* /O:-N /B
- Once the command is executed, it will display all the installed .NET Framework directories (versions).
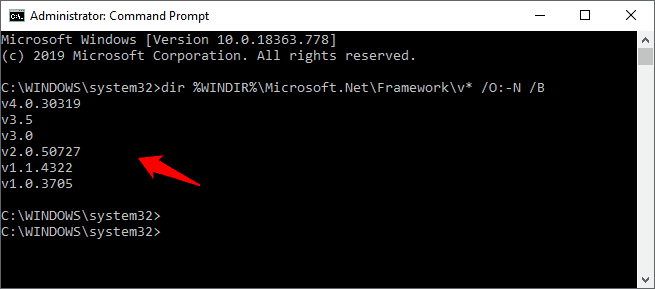
This is the quick and simple way to manually check .NET Framework version in Windows 10 operating systems. If this seems too cumbersome then worry not, we have a couple more .NET Framework version check methods that should definitely help you.
Method 2: Check .NET Version using the Registry Editor
As we all know, the registry contains a list of the .NET Framework versions installed on a computer. So, you can easily check .NET framework version using the Windows Registry Editor. Simply, follow all these steps precisely and learn how to determine which .net framework versions are installed on your Windows 10 PC. Here we go:
Warning and Disclaimer: Tinkering with the Windows Registry can be very dangerous if you don’t have the proper knowledge. So try it at your own risk, ZeroDollarTips is not liable for any damages. We would recommend you back up the registry for restoration in case it gets corrupted.
- At first, press Windows + R keys together to open the Run dialog box.
- On the Run dialog box, type regedit and then press Enter key to open the Registry Editor.
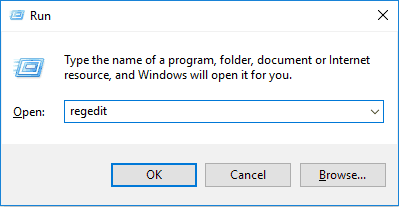
- In the Registry Editor, navigate to the following subkey:
HKEY_LOCAL_MACHINE\SOFTWARE\Microsoft\NET Framework Setup\NDP\v4\Full
Important note: If the “Full” subkey isn’t available in the registry editor, it means, you don’t have the .NET Framework 4.5 or later versions installed.
- Now in the right pane, check the value of the Release entry. Its value corresponds to a particular version of the .NET Framework.
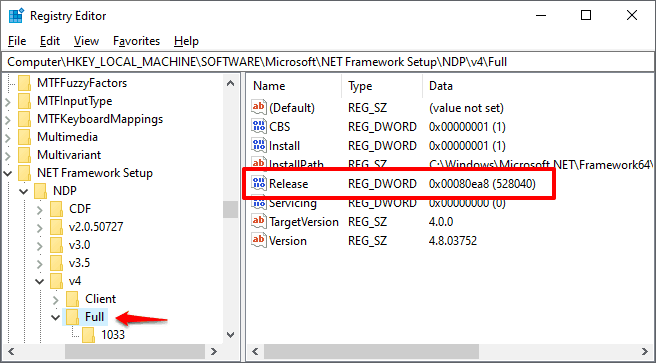
For example: Here in my case, the value of the Release entry is 528040, which is the release key for .NET Framework 4.8. It means the 4.8 version of .NET Framework is running on my Windows 10 computer.
Hence, by checking the Release REG_DWORD value in the registry editor, you can easily determine which .NET Framework versions are installed on your system.
Detect .NET Framework Version
As we know, the Release REG_DWORD value in the registry represents the version of .NET Framework installed on a Windows computer. So here is the list of .NET Framework versions and their associated Release REG_DWORD values:
| Value of the Release REG_DWORD | .NET Framework Version |
| 378389 | .NET Framework 4.5 |
| 378675 and 378758 | .NET Framework 4.5.1 |
| 379893 | .NET Framework 4.5.2 |
| 393295 and 393297 | .NET Framework 4.6 |
| 394254 and 394271 | .NET Framework 4.6.1 |
| 394802 and 394806 | .NET Framework 4.6.2 |
| 460798 and 460805 | .NET Framework 4.7 |
| 461308 and 461310 | .NET Framework 4.7.1 |
| 461808 and 461814 | .NET Framework 4.7.2 |
| 528040, 528209 and 528049 | .NET Framework 4.8 |
Method 3: Check .NET Framework Version using PowerShell
In case, if you think that other .NET Framework version check methods are complex and giving you incomplete results then you should use the Windows PowerShell for quick and accurate results.
This is one of the easiest ways to check .NET Framework version on your system. And we personally recommend this method as it is the fastest and one of the safest. To check .NET framework version in Windows 10 using Windows PowerShell:
- At first, go to the Windows 10 Start Menu Search box and search for PowerShell.
- From the search result, right-click on the Windows PowerShell and then select the Run as administrator option.
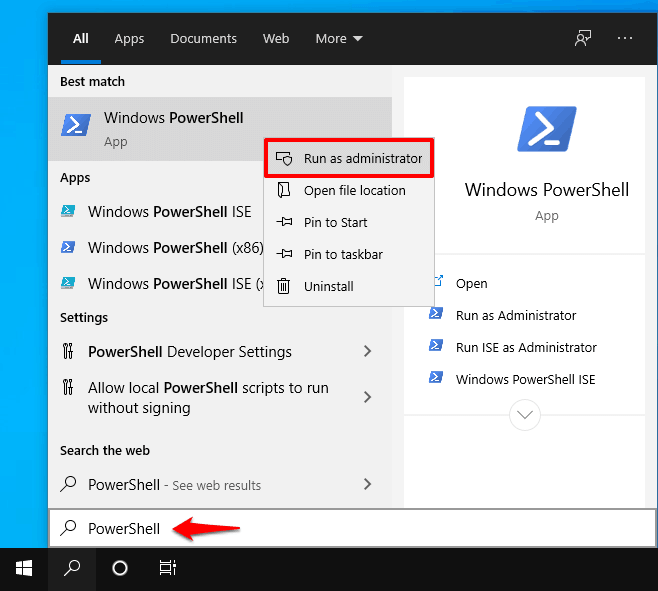
- Once the Windows PowerShell with administrator privileges is opened, type the following command and then press the Enter key:
gci ‘HKLM:\SOFTWARE\Microsoft\NET Framework Setup\NDP’ -recurse | gp -name Version -EA 0 | where { $_.PSChildName -match ‘^(?!S)\p{L}’} | select PSChildName, Version
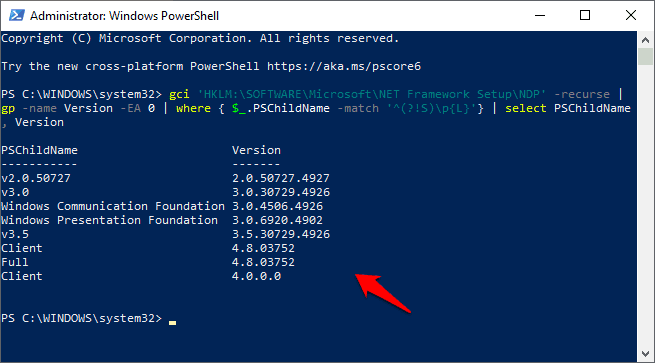
As soon as you give this command, it will display all the installed .NET Framework versions. It could be a bit hard to understand but you will know all the versions installed on your system from the results.
Conclusion – Check .NET Framework Version
If you are not an experienced computer user and don’t’ want to proceed with the method of checking .NET Framework version using the Windows Registry Editor then we recommend you try the first (Method 1) or the third (Method 3) solution as these are the methods that work best, are safe and don’t cause any sort of harm to your system. None of the methods on this list will cause any issues if they are followed to the tee.
We are certain by now all your questions (How to check .NET Framework version in Windows 10 PC? And which .Net version does Windows 10 have built-in?) have been answered satisfactorily.
If you have still any more questions for us related to Microsoft .NET Framework for Windows 10 or want any other sort of help then reach out via our Contact us page or through the comments below. We will respond to you as quickly as possible.
You may also be interested in checking out:
- How to Check Windows version, Build and Edition from ISO or DVD
- How to Check Your CPU Temperature in Windows 10
- 14 Best Free Windows 10 Product Key Finder Software
- How to Check for Windows Updates in Windows 10
- How to Fix Windows 10 Update Stuck at Checking for Updates