Change DNS Server – Learn what is DNS server? Why you should change DNS Server address? How to change DNS server on Windows, Mac, and Android with the best public DNS servers?
Have you noticed that lately your computer has been taking longer to open files as well as to load new tabs?
Or, have you been trying to enable parental control over a selected list of websites and web content? If yes, then it is probably high time for you to change DNS server.
Before we begin today’s discuss on how to change DNS servers, let us take a closer peek at what exactly a DNS server address does and how to change DNS server on Windows, Mac and Android operating systems:
What is DNS Server?
DNS server address or DNS stands for Domain Name Server and it is a primary encoding system which basically translates all the domain names from their general alphabetical form to its IP Address. For instance, Google.com is converted into its IP Address (say 216.58.196.110) by the Domain Name Server.

So what exactly is the use of having an IP Address for each and every website on the internet? The answer is simple! We, human beings, find it very easy to remember the names of websites in their alphabetical forms, such as Google.com and Facebook.com.
On the other hand, machines are only capable of understanding the IP Addresses. In a way, we can say that the actual use of DNS is for the purpose of resolving the domain names into their IP Addresses. DNS can be seen as a huge digital address book which consists of all the websites names that exist on the internet and its equivalent IP Addresses.
Related tips you might like »»
Why You Should Change Your DNS Server?
There are several reasons of changing DNS Server. Sometimes you may not be able to open few websites using your current network and websites may also take extra time for loading. In other cases, you may want to change DNS Server when putting parental controls on certain websites. Changing DNS Server has several other perks which are listed below:
- Speedy Performance: IP Address is a must for all websites to get loaded and depending on your network, it may take several seconds for resolving the DNS. The faster your DNS Server is, the quicker your websites will get loaded. Also, the larger the database of your DNS server is, the name will be found easily without the need of searching across other DNS servers.
- Greater Safety: Different DNS severs have different vulnerabilities and there are many DNS servers which do not operate under DNSSEC. DNA servers also enable the filtering of web addresses against any kind of malicious content.
- Increased Reliability: Most of the DNS servers are available to users for 100 percent of the time. If yours is not, it is a clear indication that it is time for you to change DNS server on Windows, Mac and Android devices.
How to Change DNS Servers?
If you are wondering how to change DNS server on Mac, Windows and Android, follow the step by step guide explained below and speed up your browsing experience, improve your security, and get the results you expect with absolutely no redirection:
(1) Change DNS Server on Windows
Step (1): Go to the Start Menu and type “Network and Sharing Center” and hit Enter.
Step (2): This will open a new window with lots of network options.
Step (3): Go to the Connection you use by clicking on Change adapter settings.
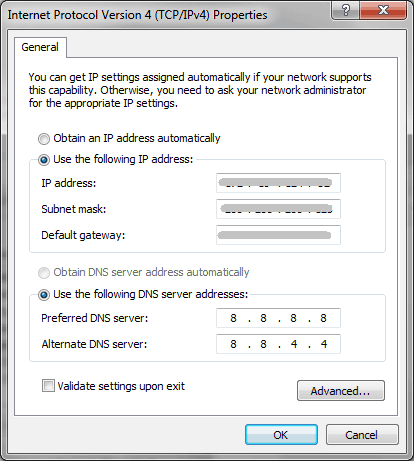
Step (4): Click on your Connection Name → Properties → Internet Version Protocol (TCP/IPv4) → Properties.
Step (5): After this, select “Use the following DNS server”. Type in the Primary and Secondary IP Address and click on OK button to save the changes made. You can get fastest DNS servers from here.
If you are planning to switch between DNS frequently, make sure to use the DNS Jumper software. To see the effects of changing DNS, you will have to flush previously- made settings. Open CMD → Type “ipconfig/flushdns” and press Enter.
(2) Change DNS Server on Mac
Step (1): Launch the Spotlight using the shortcut (cmd+spacebar) and Type in Network.
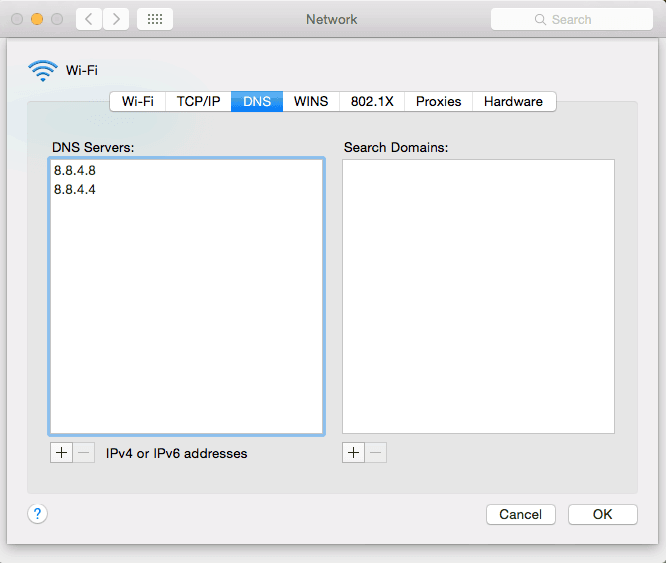
Step (2): There will be a green dot next to the connection that you are currently using. Click on “Advanced Settings” here and select “DNS” in the properties of the connection. Click on the Plus (+) sign.
Step (3): Add DNS1 and DNS2.
Step (4): That’s it! Now, click the Ok button to save the changes.
(3) Change DNS Server on Android
Step (1): Go to the Wi-Fi settings.
Step (2): Long press the Wi-Fi network whose DNS you want to change. Select “Modify Network”.
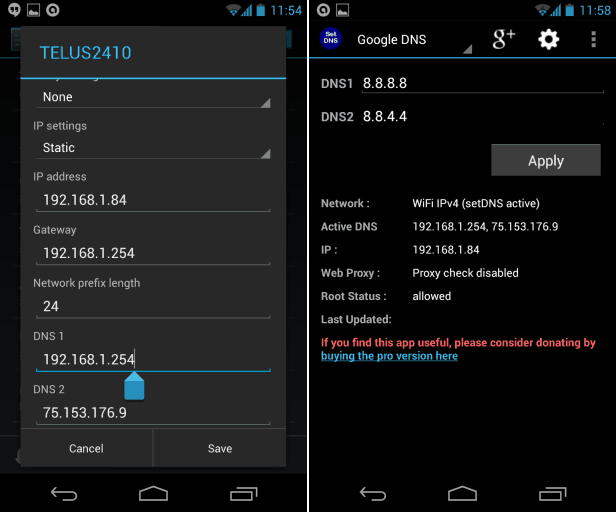
Step (3): Tick on “Show hidden options” and select “Static IP Address”.
Step (4): Type the name of the server that you want to add under DNS1 and DNS2.
Step (5): Apply to save the changes!
Conclusion
Thus, you can imagine how simple is to change DNS server address on Windows PC, Mac OS X, and Android devices. So, the next time whenever you feel that your computer is slowing down, check this list of fastest DNS server in the world to grab the best public DNS servers and follow above mentioned easy step by step guide and change DNS server for Android, Windows and Mac.
Please, feel free to share with us if you know other simple methods to change DNS Server on Windows, Mac, and Android smartphone or tablet.


So far I have had good luck with arcvpn in changing my IP.