Change public network to private network with the Windows 10 change network type solution. Learn how to change network from Public to Private in Windows 10 PC.
Whenever you connect to a new network for the first time, you are given the option to choose between Private network and Public network. Like all Microsoft Windows operating systems, this network type selection option is also available in Windows 10 operating system.
Setting your computer on Private Network will make your computer safe and secure from other devices which are over the ISP and it is also suggested that one should always use Private Network whenever they connect to a new network.
If you are at a public place like airport, hotels, shopping malls or trains and want to access the internet then you will be given an option to choose between public network and private network while connecting to the Internet.

Windows 10 change network type | Change network from Public to Private | Image credit: PCWorld.com
Setting the network mode to Private will be the best option to consider in this case for safety reasons, and if you want to share the data which is present on your computer with other devices or make your computer discoverable on the network then you can set your network to private.
If you have set the network to public, you won’t be able to share the data which is present on your computer among other devices on the same network.
We know that many of you won’t be aware of Windows 10 private network or Windows 10 public network, and the difference between two. In order to understand – what is the difference between public network and private network or how to change network from public to private in Windows 10 PC, you have to read next section of this post.
What is the Difference between Private Network and Public Network?
If you are using Private network then you will be able to use the Network discovery feature also. This means that other devices which are in your network will be able to see your computer and file sharing is also possible. The HomeGroup feature is used by Windows for sharing files between devices on the private network.
Coming to Public network, you are going to get this network in coffee shops, airports, hotels etc. If you are using Public network on your computer, your PC won’t be discoverable on the network and you won’t be able to share any files. This means network discovery feature is disabled on your computer if you have enabled the Public Network.
Now that you have read about private network vs public network, let’s find out how to make a network private in Windows 10 computer. Here are the Windows 10 change network type solutions.
How to Change Network from Public to Private in Windows 10
As we all know, whenever we connect to a network for the very first time Windows asks whether we want our PC to be discoverable on that network or not. In this situation, if we select Yes then Windows automatically sets the network as Private. And if we select No, Windows automatically sets the network as public.
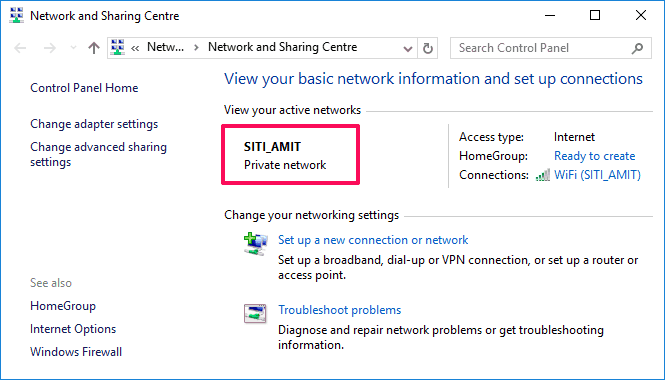
If you want to know whether your Windows 10 computer’s network is private or public, you can see it by going to Control Panel > Network and Internet > Network and Sharing Center. You would be also happy to know that network type is changeable and you can easily change network from public to private or change network from private to public anytime you want.
In Windows 10 computers, switching network from public to private or private to public is a quite simple task and it doesn’t involve any complex changes in the settings.
Here we have explained top five best Windows 10 change network type methods which are going to help you in knowing how to change network from public to private in Windows 10 laptops or desktop computers.
Method 1: Change Network from Public to Private using Settings
According to most of the windows users, the simplest way to change from public to private network in Windows 10 is the use of Settings app. Here’s how to change network type in Windows 10 using Settings app:
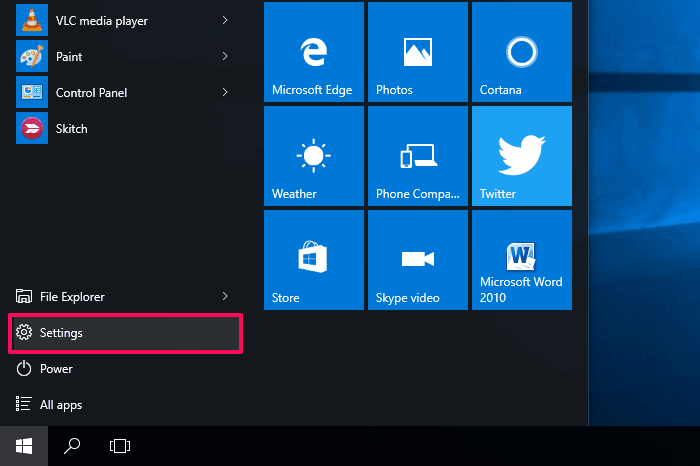
Step (1): First of all, go to Start menu and then click on Settings option to open it.
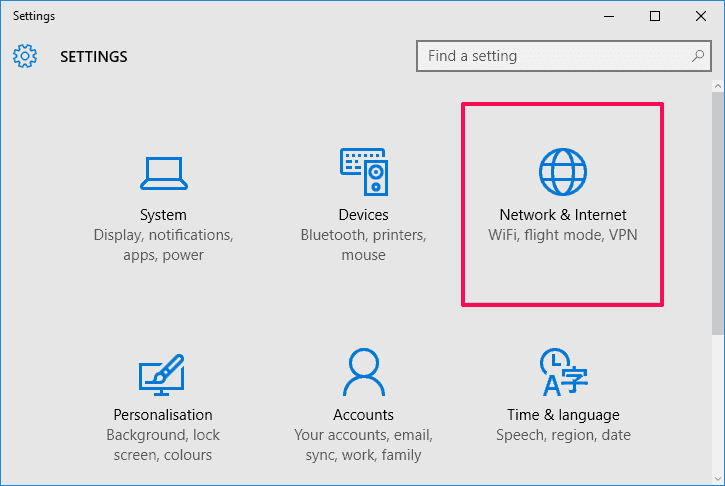
Step (2): Once you have opened the Settings, click on the Network & Internet option.
Step (3): Now from the left pane, select and make following changes:
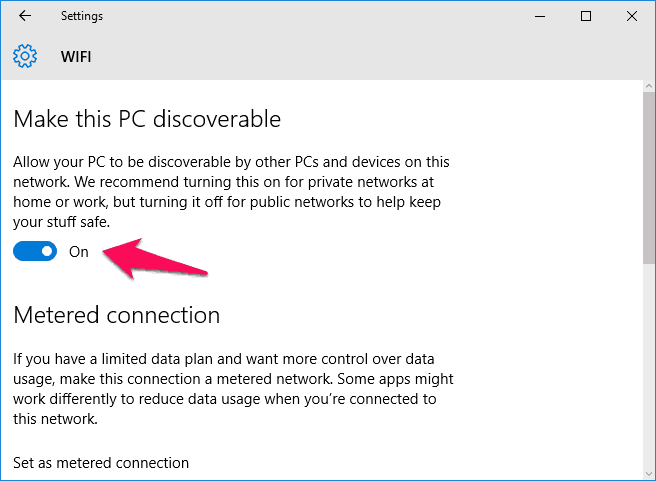
Case I – If you are using a WiFi connection, simply select WiFi option then scroll down and click on “Advanced options” link.
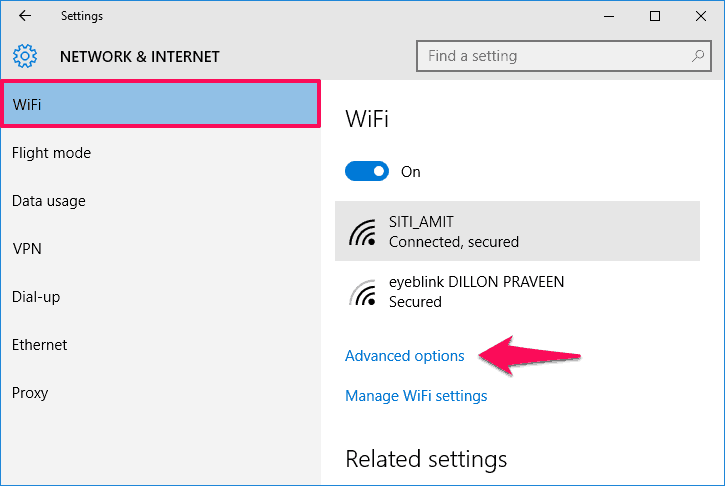
Now on the next window, turn ON the option of Make this PC discoverable to change the Windows 10 network type from Public to Private.
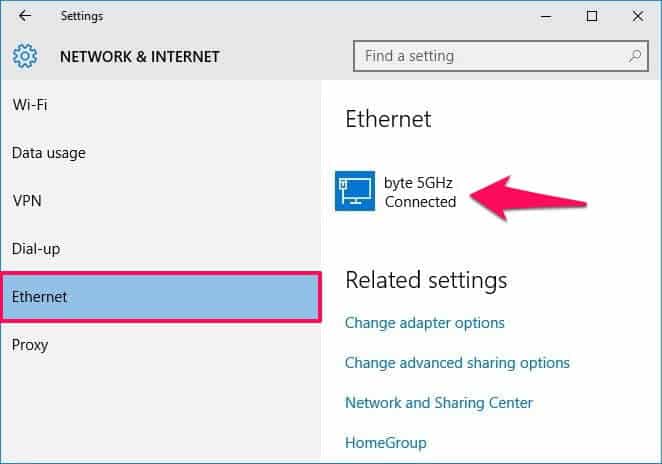
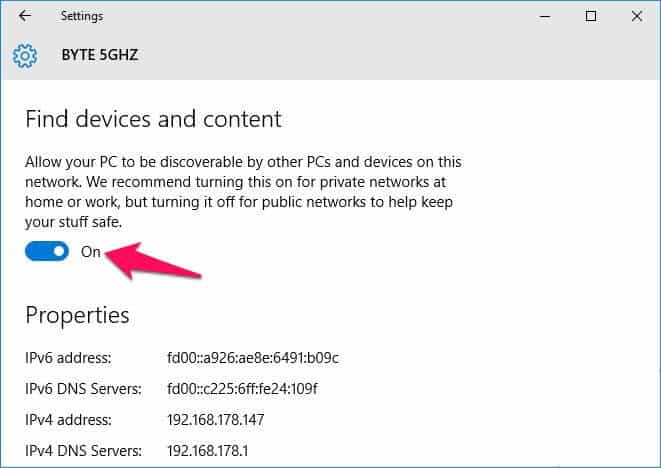
Case II – If you are using a wired Ethernet connection, simply select Ethernet option and then click on your network connection icon.
Now on the next window, turn ON the option of Find devices and content to change network from public to private.
Once you made these changes, the network type will be changed from public network to private network in Windows 10. Now you can take benefits of network discovery features for easy file sharing and media connection between your PCs.
Method 2: Windows 10 Change Network Type using HomeGroup
HomeGroup is another best option which you can use to change public network to private network in Windows 10 system. In case, if you were not able to change from public to private network by following the first method then you can try out this one. Here’s how:
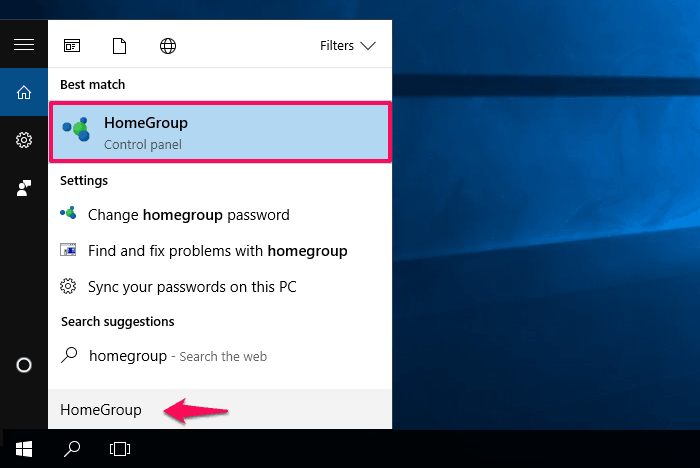
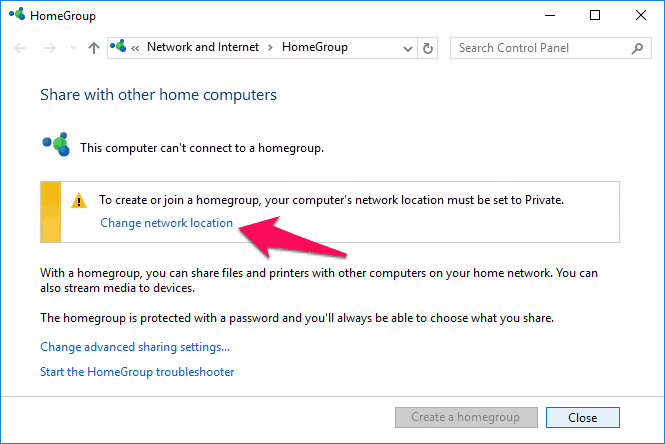
Step (1): At first, go to Start menu and then type HomeGroup in the search box. Now from the search results, click on HomeGroup to open it.
Step (2): Once HomeGroup settings windows is opened, click on the Change network location option.
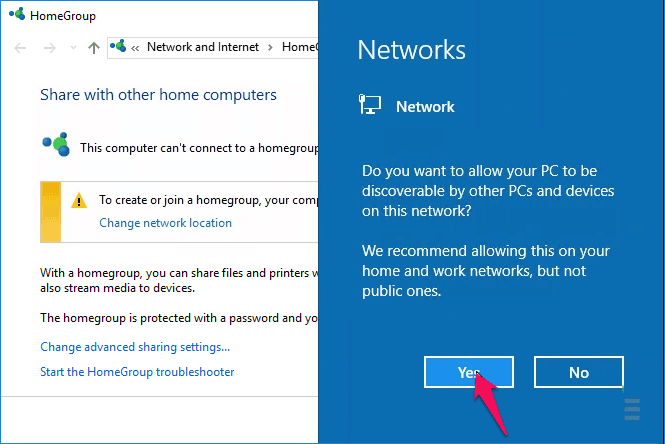
Step (3): Now you will see a dialog box on your computer which will say “Do you want to allow your PC to be discoverable by other PCs and devices on this network?”
Step (4): Simply, click on Yes button to change network type in Windows 10.
This action will change your Network type to Private. Thus, you can see how simple is to change network from Windows 10 public network to Windows 10 private network.
If you want to verify that your network type is private or public, go to Control Panel and then open Network and Internet option. From here click on Network and Sharing center and you will be able to see Private Network under Network confirming that Private network is being used on your computer.
Method 3: Change Public Network to Private using Windows Registry Editor
Windows Registry Editor is known for solving many annoying issues and errors encountered on Windows computers and we can use it to change the types of network in Windows 10 too (change network from public to private). Please keep in mind, this Windows 10 change network type method is ideal for advanced users.
Step (1): First of all, open Run dialog box by pressing Windows + R keys together and type regedit in the Run dialog box then press Enter.
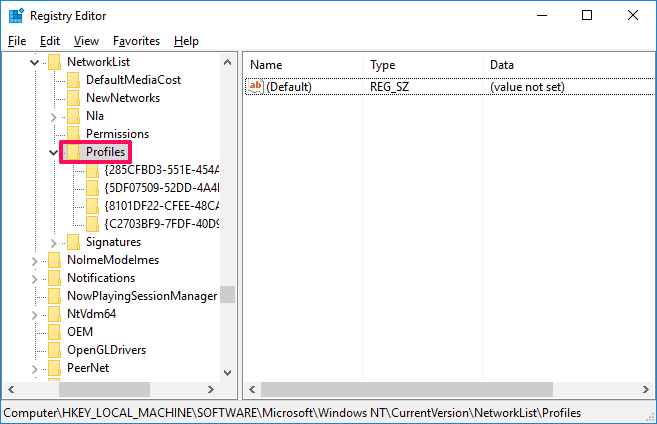
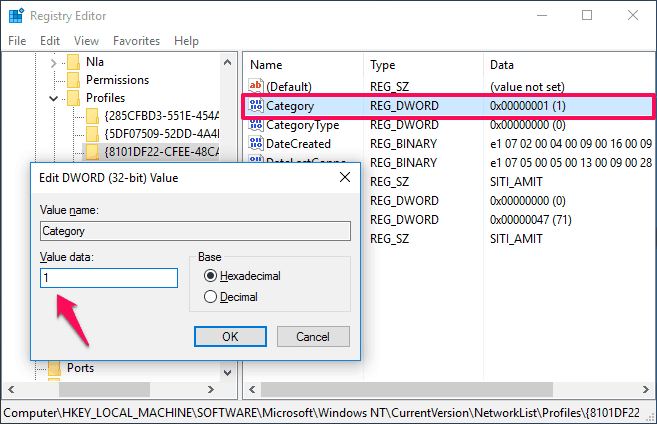
Step (2): Once Registry Editor window is opened on your computer, navigate to the following registry key:
HKEY_LOCAL_MACHINE\SOFTWARE\Microsoft\Windows NT\CurrentVersion\NetworkList\Profiles
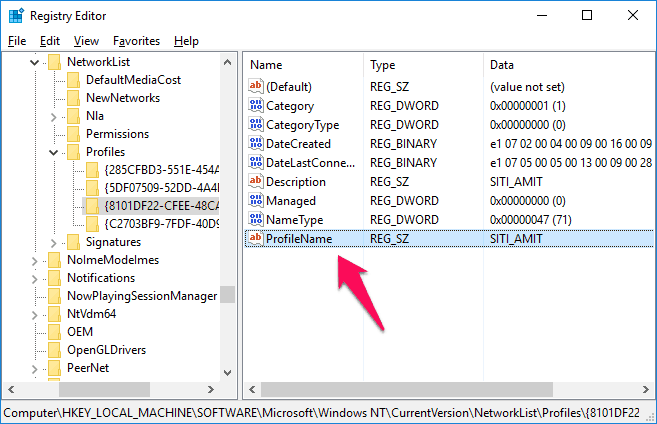
Step (3): Under Profiles registry key, you will find some sub-keys. Open each key and look for a key named ProfileName in the right-hand pane. You need to know the name of the network whose network type you want to change.
Step (4): Once you have located your network, open it and change the Category DWORD value by double clicking on it which is in right-hand pane. Here you have to set the Category value data to 1 as we want to use the Private network.
If you want to use Public Network, you have to set the value to 0 and for Domain network you have to set the value to 2.
Once done, simply close the Registry Editor window. That’s it! You have successfully changed the Windows 10 network type from Public to Private. Enjoy!
Method 4: Change Network Type in Windows 10 using Local Group Policy Editor
The use of Local Group Policy Editor is also a very convenient way to change public network to private in Windows 10 operating system. But in order to change network from public to private in Windows 10 using Group Policy Editor, you need to have admin rights on your computer.
If you are having admin rights, you can follow the steps which we have mentioned below to change from public to private network:
Step (1): At first, open Run dialog box by pressing Windows + R keys together and type gpedit.msc in the Run dialog box then press Enter.
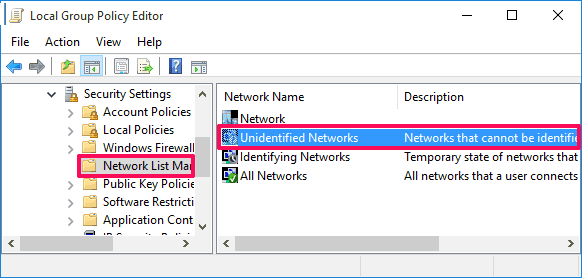
Step (2): Once the Group Policy Editor window is opened, navigate to the following location:
Computer Configuration\Windows Settings\Security Settings\Network List Manager Policies
Step (3): On the Network List Manager Policies, double-click on Unidentified Networks option.
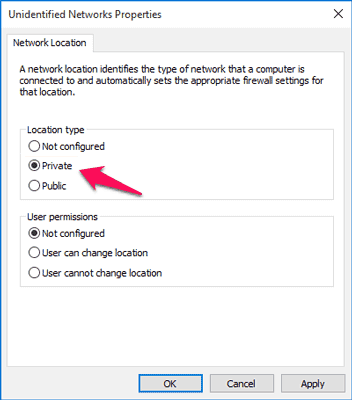
Step (4): Now on the Unidentified Networks Properties window, change Location type from Not configured to Private.
Step (5): Finally, click on the OK button to save the changes.
That’s it! This is how to make WiFi private or switch from Windows 10 public network to Windows 10 private network using Local Group Policy Editor.
Method 5: Change from Public to Private Network using Powershell Commands
This is the last Windows 10 change network type solution of this guide which you can use to change types of network in Windows 10 laptop or desktop computer. Here, we are going to use Powershell commands and in order to use Powershell commands, you need admin rights again.
So if you are having admin rights, you can follow the below-explained steps to change network from public to private in Windows 10 operating system:
Step (1): First of all, right-click on the Start button and from the quick access menu select Command Prompt (Admin) option.
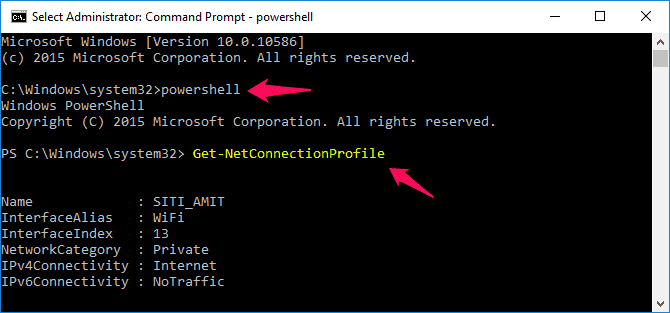
Step (2): Once you have opened Command prompt with admin rights, type powershell and press Enter.
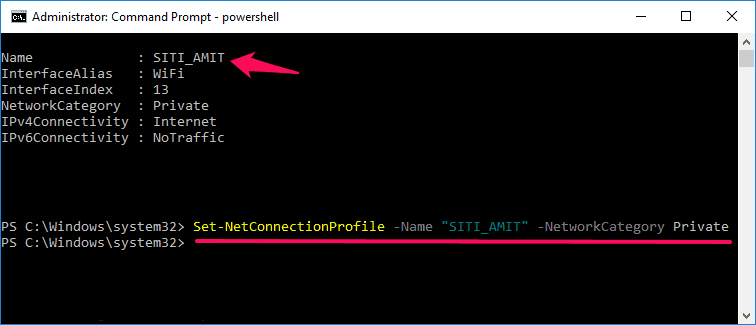
Step (3): Next, you can start changing the network type by executing the command mentioned below:
Get-NetConnectionProfile
With this command, you will get the name of your network. Note down this network name as we are going to use this in next command.
For the example: Here my network name is SITI_AMIT, so I will use it in the command.
Step (4): Now you have to enter the next command but use the name of your network instead of SITI_AMIT. The command along with the network name which you got in the last step should be like this:
If you want to change network from public to private:
Set-NetConnectionProfile -Name "Network" -NetworkCategory Private
If you want to change network from private to public:
Set-NetConnectionProfile -Name "Network" -NetworkCategory Public
Important note: Replace “SITI_AMIT” by your network name and then execute the command.
Once you have executed this command successfully, your Windows 10 network type will be changed to Private or public according to your wish.
Conclusion
So, these are some of the most simple and active methods to change public network to private network in Windows 10 operating system. We hope you found this “Windows 10 change network type” guide useful for you and now you will be able to easily switch a network from public to private or private to public within seconds.
Let us know using the comments section below – Which method helped you in changing from public to private network in Windows 10 PC?
If you liked this tutorial “how to change network from public to private in Windows 10” then feel free to share it with your friends on social media sites like Facebook, Google Plus, and Twitter etc.
You might also like to see: Top 12 Best USB WiFi Adapter for Windows 10


Window 10, one of the most likely OS by Microsoft. Window 10 has such amazing features but most of user don’t know Window 10 features as this Change Network from Public to Private in Windows 10
I also didn’t know how to Change Network from Public to Private. So thanks for this informative article.